Subwoofer and speakers -
Unless mentioned otherwise, reference to speakers means the sidelights with speakers
(speakerlights). Sub-
When the Audio Out from the PC is connected to speakers, it needs to be amplified. This is normally done:
-
-
-
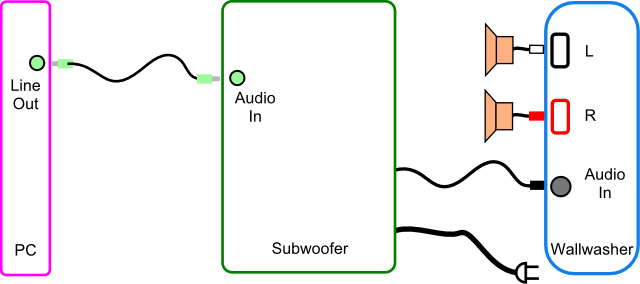
With the amBX system, the Audio Out (Line Out) from the PC connects to the subwoofer
which contains a built-
There is no amplifier on the wallwasher. The output to the speakers is taken directly from the wallwasher Audio In socket to the red and white Speaker & Front Light sockets.
The operation of the lights is not affected by the speaker connection as all the light information comes from the PC via the USB connection. A faulty subwoofer / amplifier should have no effect on the light display. If there is no sound and no light display, suspect a problem (hardware or software) on the PC side, on the wallwasher, or with the wallwasher USB / PSU connections.
Note
The wallwasher needs to be switched on, with a working USB connection, and connected
to the subwoofer via the 7-
7-
The 7-
Pin 1 -
Pin 2 -
Pin 3 -
Pin 4 -
Pin 5 -
Pin 6 -
Pin 7 -
Connecting a sound source to the sidelight speakers
If the subwoofer / amplifier is faulty (or you have no subwoofer but still want to use the speakers on the sidelights if you have them), this can be easily done. However, you will have to have a suitable amplifier (that matches the speakers) between the PC Audio Out and the wallwasher Audio In to amplify the sound from the PC.
The Audio In is a standard 7-
To make sure that you get the best sound, connect the output from the new amplifier as shown on the connections list above.
You will need to make sure that the phases are correct. If they aren’t, the speakers will work OK, but the sound may be a bit flat.
I’ve gone into details here, but it’s a much simpler job than it sounds. Basically,
all you need to do is connect the four output wires from the amplifier to a 7-
Also see the Audio In pin-