Fans
The fans are both the same and can be used in either socket on the wallwasher. See the Wallwasher main unit / Wallwasher circuit description and Wallwasher main unit / Wallwasher circuit diagram pages for more details.
Extending the cable
The pin-
The cable is shielded and contains two wires, red and black (although the colours may vary). Only the two wires are connected to the fan, there is no connection to the cable screen inside the fan. The screen connects to the metal shell of the fan plug and thus to ground via the socket shell on the wallwasher. The fan contains electronic regulation components.
The fan is connected to the wallwasher by 5-
Modifying a plug
One option if you need a plug, is to get a 6-
The photos below show the before and after conversion. The unwanted pin was cut out with a small pair of side cutters. You could cut the other end of the pin off as well if you want to (the solder side) but it doesn’t matter if it’s left on.
Originally I was going to gouge the key out with a mini drill but, as I didn’t have mine to hand, I used the side cutters on that as well. I used a nail file to remove the tiny bit of key that was left. Space is a bit limited when trying to get to the key, so you have to be careful. The damaged pin 5 was the result of me accidentally trapping the pin in the jaws of the side cutter on my first attempt to cut the key. Luckily only a small piece of the pin is missing and that made no difference to it making a connection with the wallwasher.
When modifying the plug, remove the outer metal shell to allow you to get to the
pins and key easier. Once you have finished, check that none of the plug pins are
bent. This is important because the plug won’t fit into the wallwasher socket unless
the pins are lined up correctly and any attempt to force the plug in could damage
the plug or socket. When bending the pins, move them gently -
The 6-

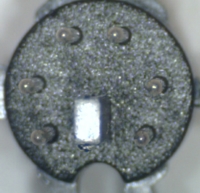
Fig. F1a: Now you see it, now you don’t!
Left: 6-
Right: pin (top left) and key removed
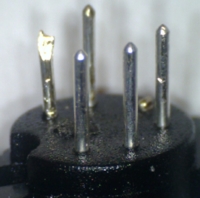
Fig. F1b: Another view of the modified plug
Showing the pin I damaged!
Modifying a socket
If you are making an extension cable, you will need a socket. It’s unlikely that you’ll find one, so what can you do?
The key on the socket is a hole, this is what the plastic key on the plug fits in to. The key on a six pin socket is in a slightly different place to that on a five pin socket. There are different options:
Option one would be to make the hole bigger to fit the existing 5-
Option two, a simpler option, is just to cut the plastic key off the fan plug. Because the fan plug is moulded on to the cable instead of in parts like a bought plug will be, it will be more difficult to reach the key with side cutters. The easiest way to remove the key would be to use a mini drill or similar to gradually hack away at the key. Practice on an old PS/2 or similar plug first.
Option three would be to replace the fan plug with a modified one as described above.
Inserting a cable
If you cannot get the plugs / sockets, you may want to cut the existing fan cable
and insert a new cable between the cuts. This is a or simple enough process and,
because there are no signals involved, the joint doesn’t have to be anything fancy.
You can use two-

Fig. F2: Inserting a cable to extend the fan cable

Fig. F3: Grid test -